
So last Spring, just before my bicycle accident, I signed up for a slew of fitting classes at the Atlanta Sewing & Quilting Expo. One of the seminars I attended was Joe Vecchiarelli's Dress Form Fitting class, where he demonstrated how to pad a standard dress form to match the unique size AND shape of the person for whom you are sewing.
 |
| Joe Vecchiarelli Customizing a Dress Form |
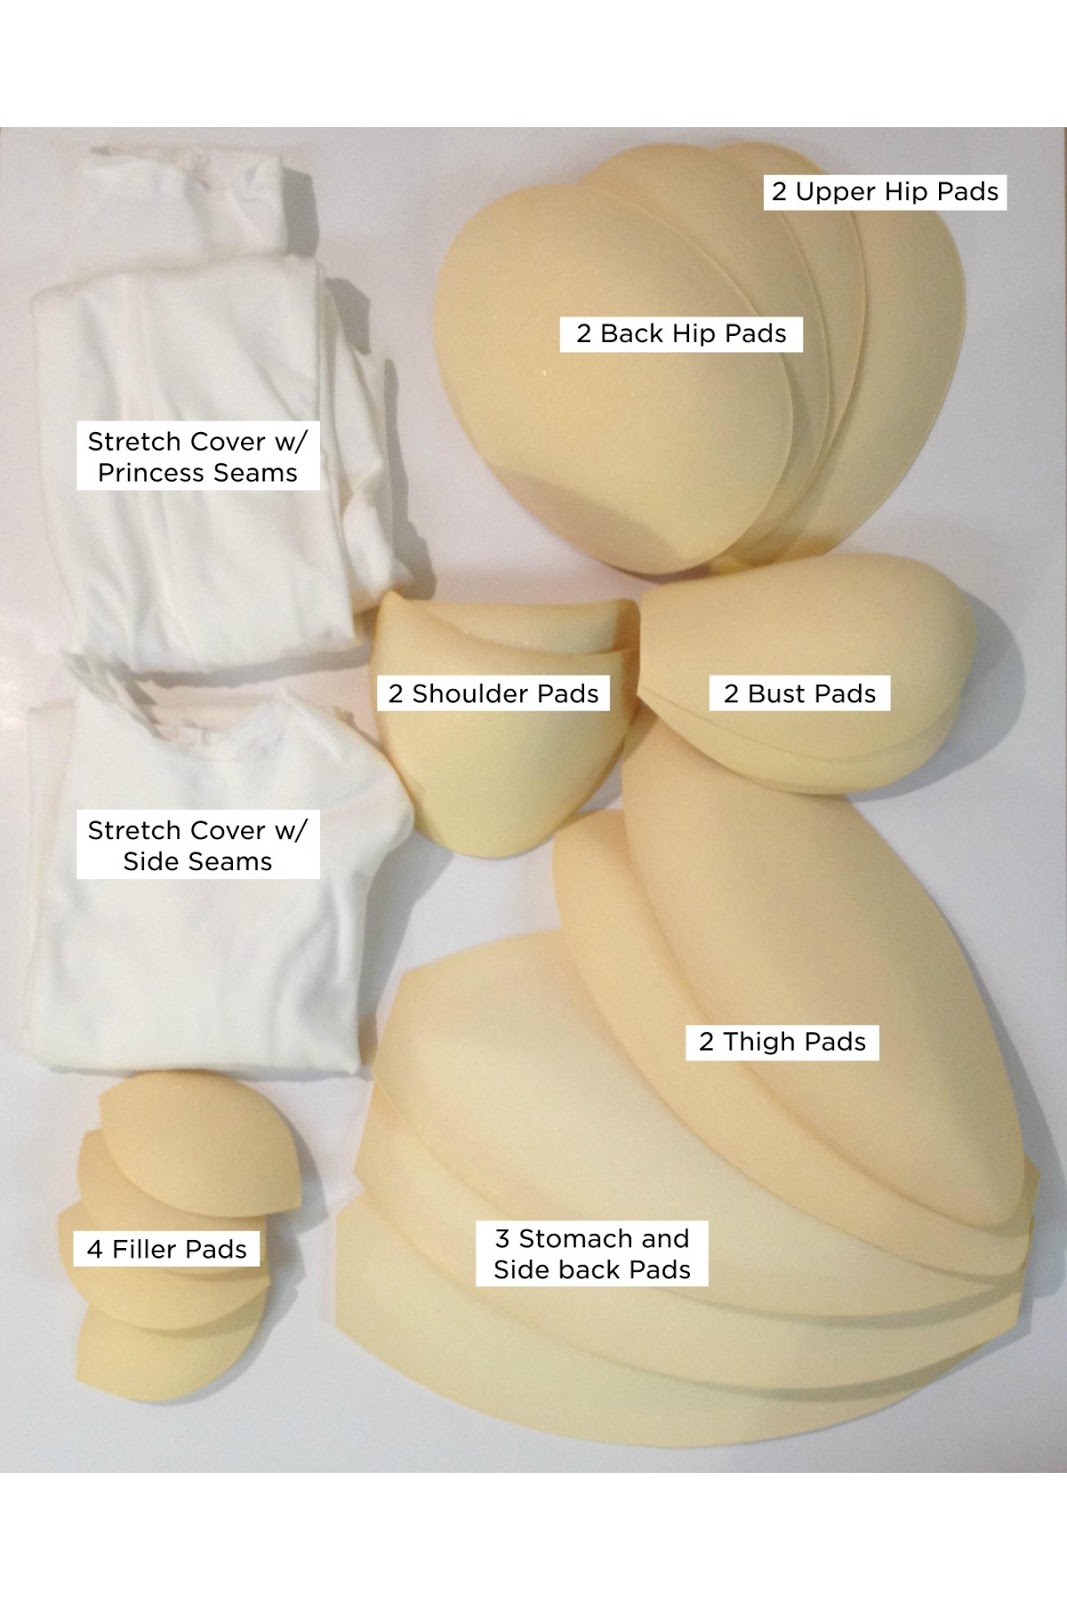
Joe asked for a volunteer who didn't mind having her measurements called out for everyone to hear, so I raised my hand to be the guinea pig. He used a polyester batting (shown in the photo above) in areas where he wanted to add width all the way around the dress form, along with contoured pads from Fabulous Fit where he needed to add curves to specific areas such as shoulders, bust, an upper back Dowager's hump, tummy, thighs, etc.
 |
| Dritz Adjustable Dress Form |
The area where I personally have the most fitting issues is the upper chest and shoulders. I have a narrow frame with broad, square shoulders, coupled with a larger bust that is hell-bent on going to visit my belly button thanks to gravity, the passage of time, and Childbirth Wreckage. So any time I try on a readymade fitted dress or blouse in a store, I get horrible horizontal wrinkles across the bust line and buttons straining, threatening to pop off and take someone's eye out, but if I go up enough sizes to fit the bust, I find that I am swimming in an ocean of excess fabric through the upper chest and back and I look like I am wearing a sack. The side seams generally pull towards the front as well, because size large and extra-large assumes that one is bigger all the way around, not just in the front. What's more, now that I have been dragged (reluctantly, kicking and screaming) into my forties, I find that I have NEW curves to contend with below the waistline: a tummy bulge that refuses to go away no matter how much I exercise and a bit more padding on my thighs and caboose.
So I ordered my Fabulous Fit Studio Dress Form back in November, when I was working on my Victorian Christmas caroling costume. I ordered a size 10, which was the size dress form that Joe recommended for me in his seminar based on my bust, waist, and hip measurements, which are between 1-2" larger than the dimensions of the size 10 form. I was so frantic about getting that caroling costume done and then got caught up in the holiday rush, so I didn't get around to trying to customize the form to match my body until last week.
With the Fabulous Fit dress form system, you begin by stretching a tight-fitting knit fabric cover over your dress form from top to bottom, inserting padding between the dress form and the cover at key points as you go. I started by adding shoulder pads to my dress form and then used the bust pads along with contour pads to increase the bust dimension and lower the bust line. As I positioned these pads, I checked to be sure that the bust span matched mine (wider than the dress form's) as well as the bust height (lower than the dress form's).
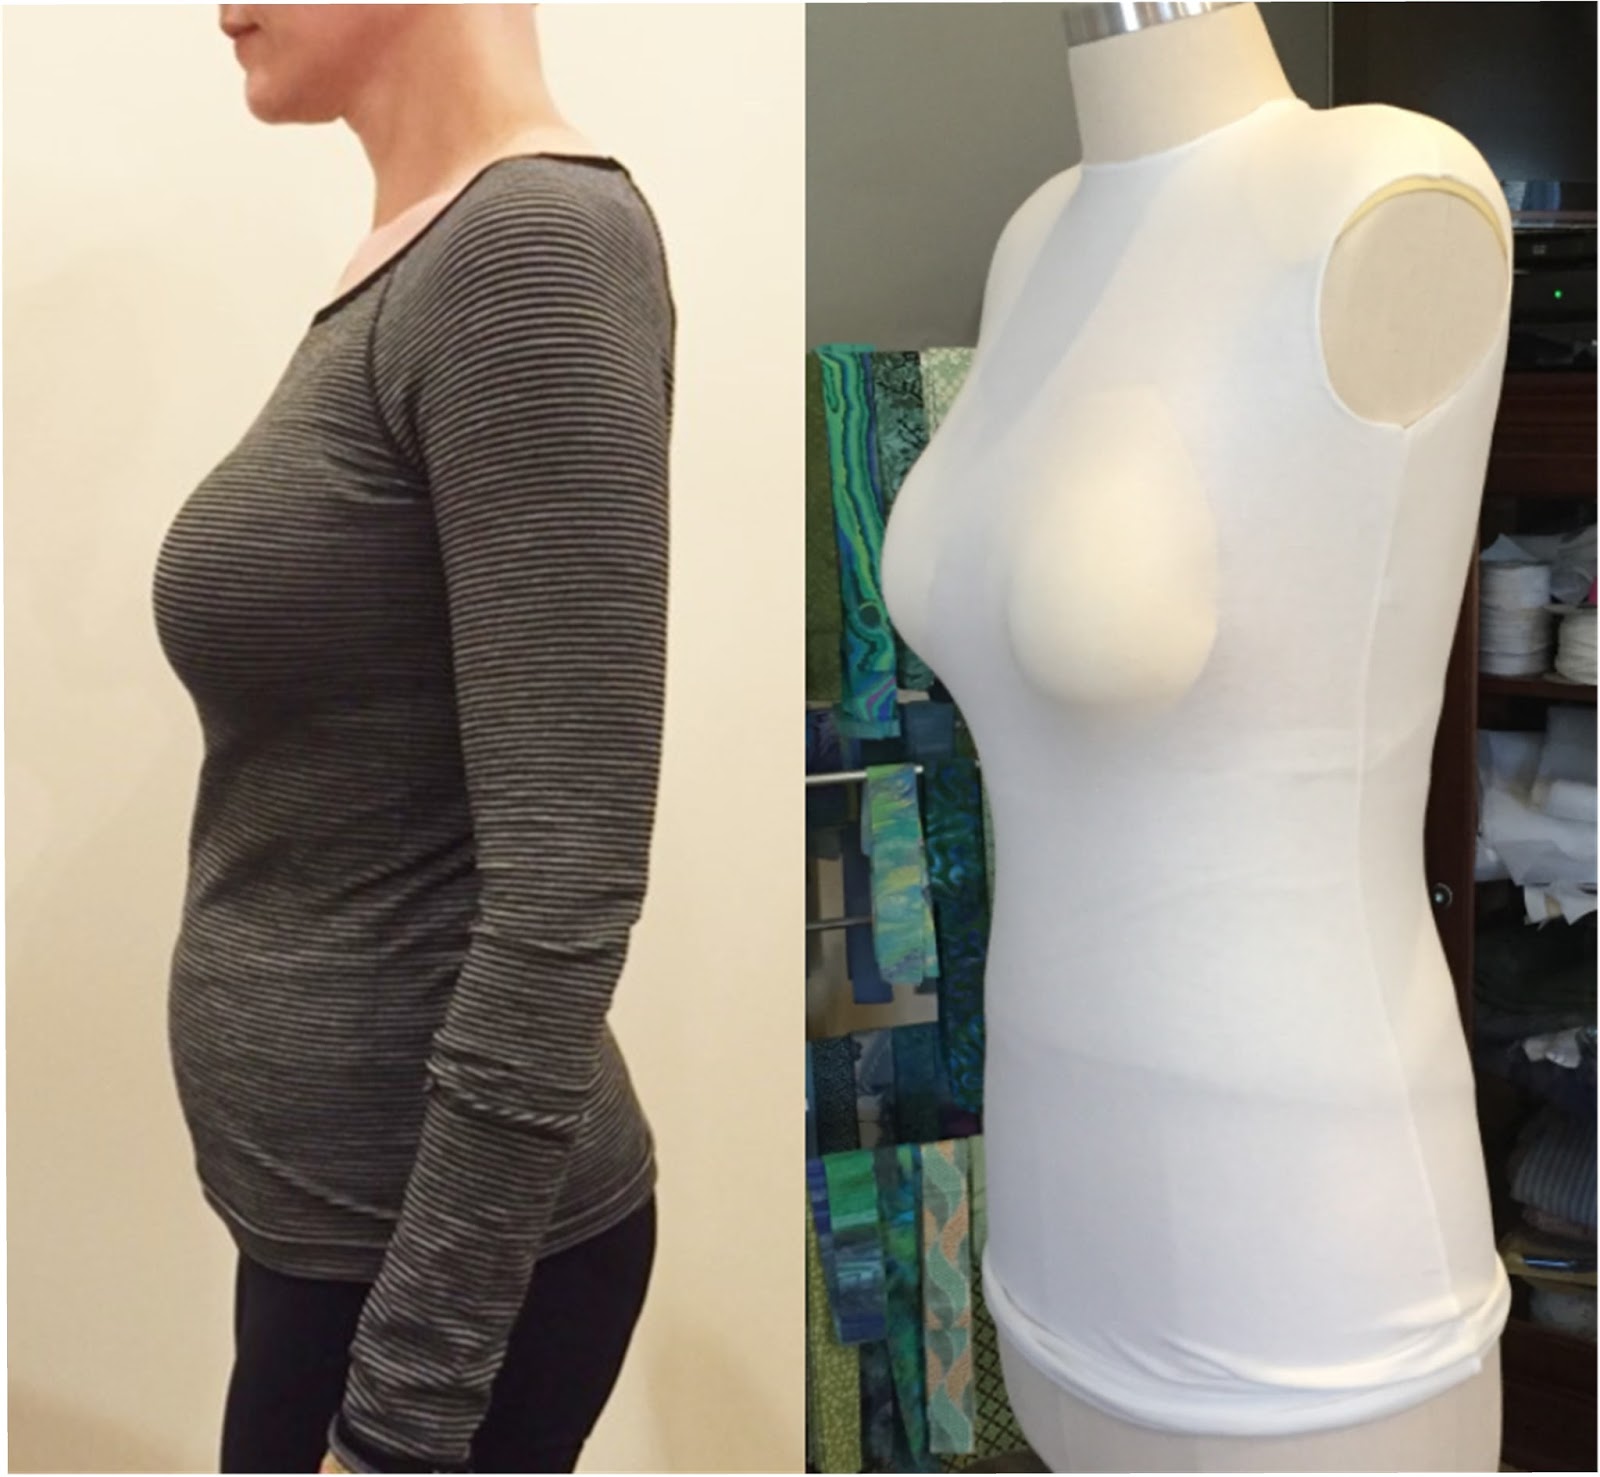
In unflattering photo above (deliberately NOT holding in my tummy) it looks like I lowered the bust line too much, but in reality it's pretty much spot-on. Note that you can ONLY successfully lower the bust line if your dress form's bust is SMALLER than yours initially, because you lower the bust by placing the bust pads just beneath the fullest part of the dress form's bust, and this automatically adds to the bust dimension. You can raise or lower the waist line in the same way to create a petite or tall torso, as long as the dress form's waist line is smaller than yours, by erasing her waistline with pads and creating a new waistline in the correct position to match your body. So far, so good, or so I thought.
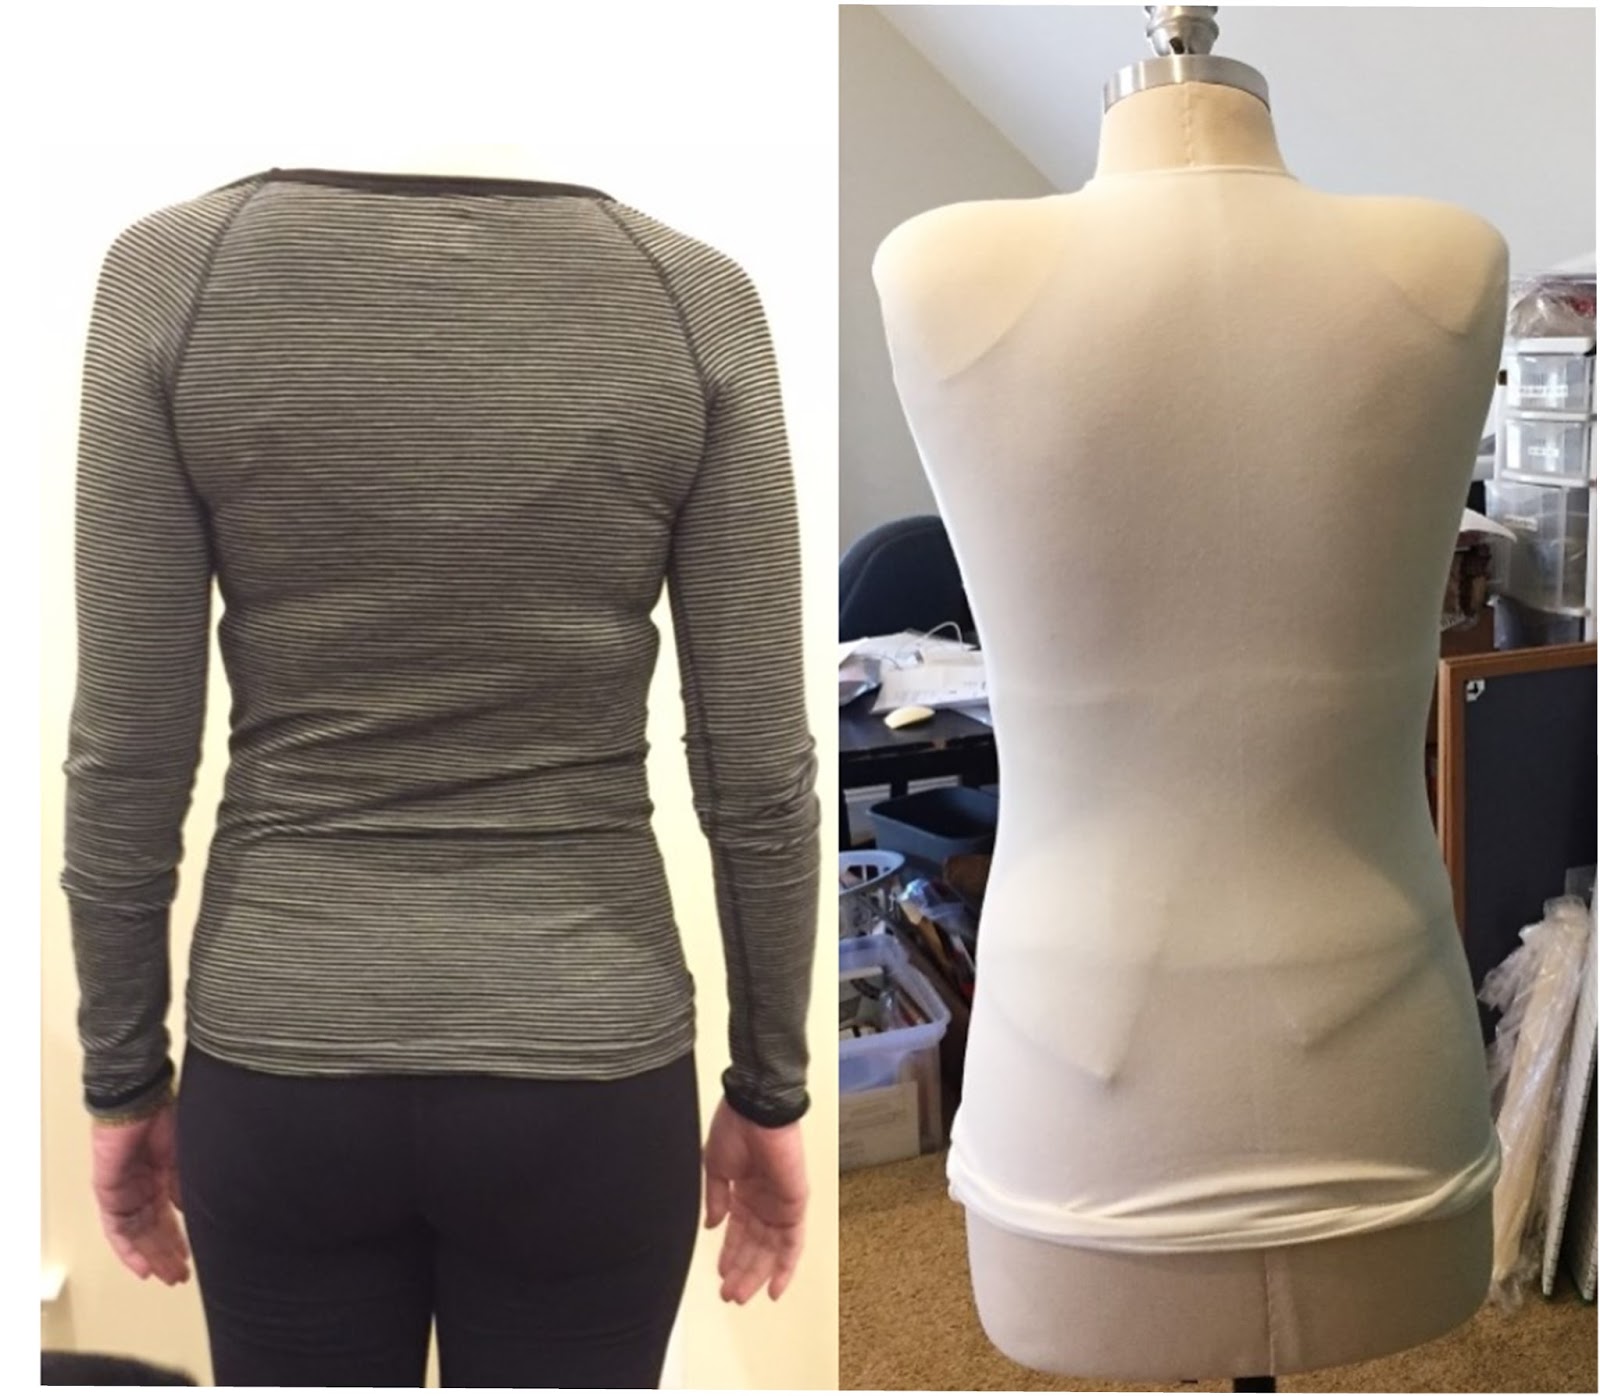 |
| Rear View, Me and the Size 10 Dress Form |
I spoke with Customer Service at Fabulous Fit and they agreed to exchange my dress form for a smaller size. I sent them my measurements along with photos from all angles so they could get a better idea of why the size 10 form wasn't working for me, and they recommended that I go with a size 6 dress form and with additional padding for the bust area. Their size 6 dress form measures 33 5/8" in the upper chest, where I measure 33 1/2", which is pretty darned close. That way she'll be small enough in the upper chest, back, and waist, and I should be able to give her a rounded, mommy-loves-chocolate-tummy and a rounded caboose without her waist and hip dimensions ending up too large.
Meanwhile, the moral of this story is that you can only make a dress form LARGER with pads, not smaller. If you're in doubt about which size dress form to order, go with the SMALLER size. Take ALL of your measurements, not just the bust, waist, and hips, and choose the SMALLEST dress form size that corresponds to at least one of your measurements. If you are bigger than a B or C bra cup, your upper chest measurement is probably the one to go with. If you need to lower the bust line for a more mature, gravity-affected silhouette as so many of us do, then it's even more important that the dress form's bust measures several inches smaller than yours. Another way to think of this is that the dress form needs to match your skeletal frame because we all carry our weight differently. If you are slender with a narrow rib cage and you gain 20 or 30 pounds, your horizontal dimensions increase but your underlying bone structure remains the same. As long as your dress form matches your skeletal frame you can always add padding wherever it's needed to match your changing silhouette and the unique distribution of your body weight, but if the dress form isn't small enough to begin with you have no room to add your personal bumps and bulges.
I do like this dress form system so far. Even though it turned out that the size 10 dress form won't match my body, I can see that the Fabulous Fit pads on a smaller form are going to enable me to mimic my shape much more accurately than any adjustable dress form could ever do. And yes, I know that I could have a custom dress form made to match my measurements for a small fortune, but what if I finally lose a few pounds, or gain a few more? I am aware of the low-cost DIY duct tape dress forms that were featured in Threads magazine a few years ago, but I wanted something with a sturdy base that wouldn't knock over, something that would look nice in my studio when it's not in use. I also didn't want to be sticking pins through duct tape, looking at duct tape, or trying to drape fabric on a slippery duct tape surface. I'm looking forward to trying this process again with the Fabulous Fit pads once I receive the smaller dress form, and I'll be sure to do a follow-up post to let you know how that works out.
Do you use a dress form? If so, which kind? Have you used Fabulous Fit pads or any other system to customize your dress form to your own size and shape? Let me know what did and didn't work for you in the comments. Happy Stitching!
10 comments:
good luck with learning how to do this - I can totally get you and the fitting room - I too have wide shoulders, and always had a rather narrow frame until I hit my 50's and now in the early 60's the tummy and waistline refuse to go back to what they were no matter that I eat ok and exercise the thighs get bigger the waistline too:( pants that used to fit now barely get over my thighs and forget about the button at the waist line - oh to be young and skinny again.
I can see where this would be a fabulous system. I don't have a dress form, but I don't make clothes anymore anyway. At one time I considered making the duct tape version but the closest friend I was willing to have see me in that condition said she probably couldn't do it without totally collapsing from laughter. That's okay, the feelings were mutual.
Interesting. I have the same firm buy have never gotten around to posing her up. Not that I need to....! And BTW that duct tape version is very difficult and I've never seen anyone really successful with it. I belonged to an American sewing Guild and we tI'd several times
I know you have moved on to your dress form but I am still fasinated by your Victorian dress and your singing.
Did the dress hold up to the task ? Will you consider singing like this again? Did you make money after the expenses of the dress? Did you feel comfortable and dressed properly for your engagements ?
I so enjoyed reading about this dress being made and how lovely it turned out.
My thought on cost of the dress is you learned (and shared) so much from it and the dress it's self will be usable for (?) years and years by you and even when you are done with it , I would think it would still have value to (?) another woman or a theater group
How was the buttoning when dressing when changing into and out of the dress?
Do show us more pictures and did you make and us that cute hate ?
And the other singers in this group are they as nicely dressed?
Lastly I hope the coming storm is not too bad for you and hoping your boys will have fun in it
I am on the left coast where we are having rain storms rolling through its so nice to have rain again
Colleen
Uniquely You is the dress form I have. I took a class that featured this dress form. It is a huge pinnacle foam form that you cut down to your size One takes the standard measurements then you do depth measurements which helps determine if you carry more curves in the front , back and the level of the curves. An electric carving knive, cheese graters and others shaving tools are used to get the right shape. It fits me to a T. If one adds or loses weight you can add more padding or shave off more foam.
For my daughter a duct tape form was used. The T shirt went on then we taped her up. The tape went on with many layers. It was cut off then taped back together. We lined it with plastic turned the form upside down put in a hollow pole and centered it. The neck and arms were sealed. Into the upturned bottom we sprayed foam insulation. We had extra cans on hand to immediately fill in more if needed, before the insulation set. Once dry/firm the duct tape was cut/peeled off the form. The cheese grater was used to smooth out rough areas and batting used to fill in misses area. We put her on a rolling stand, covered her in the moulage made from muslin. Daughters shape was duplicated exactly. We used the form to drape her wedding dress. It worked perfectly. It was a fair amount of work to get the form made but worth the effort.
I love your blog! Thanks for the detailed review of the Fabulous Fit system. I love garment sewing. In the past thirty years there has been a redistrubtion of the wealth and nothing fits quite right. I'm spatially challenged, so I think the dress form would be perfect. You are an inspiration! And I loved the caroling costume, too.
Colleen, in answer to your questions about my caroling gown:
1. Did the dress hold up to the task ? Yes, and spectators at the events loved it, but it was kind of a pain to get in and out of and VERY DIFFICULT TO TRAVEL IN!!
2. Will you consider singing like this again? Yes, I plan to sing with the same group again next year if they'll have me!
3. Did you make money after the expenses of the dress? Yes, but not much. That was a lot of yards of silk, plus the expense of the hoop skirt and petticoat.
4. Did you feel comfortable and dressed properly for your engagements ? I only feel comfortable in sweatpants or pajamas, so anything with a boned bodice and a giant poufy skirt is not going to be comfortable to me! Since these were paid caroling gigs and we were advertised as appearing in "authentic Victorian/Dickensian costumes," I feel like the costume was enormously helpful in creating that extra theatrical drama that crowds, nursing home residents, etc. enjoyed. Also when you are nervous about messing up your songs, a great costume helps you to get into character and project a level of confidence that you might not be feeling. :-) I'm in Charlotte, North Carolina, and many of the gigs were indoor events, but of the outdoor events only one of them was really very cold. For that one I layered thin thermals from Athleta under my costume for added warmth and that worked just fine.
5. How was the buttoning when dressing when changing into and out of the dress? The buttoning did get easier with practice and maybe the holes stretched a little with repeat use, but those buttons did slow me down when I was trying to get changed in a rush. If I did it again, I might sew (but not cut) buttonholes, sew the buttons right on top of the buttonholes, and then use hidden snap closures to make it easier to get in and out of the costume in a jiff.
6. ...did you make that cute hat ? I ended up buying a readymade feathered "fascinator" headpiece for $35 instead of making a hat. The feather piece is attached to a headband so it's easy to get on and off, and does not cover my ears (and muffle the other singers' voices) the way most bonnets would. The fascinator also did a better job of achieving my design goal of a "Victorian" dress that could straddle multiple eras and not look anachronistic when singing all the great songs from the first half of the 20th century like White Christmas, Let It Snow, Rudolph, Chestnuts Roasting on an Open Fire... Also my creative DIY mojo was BURNED OUT by the time I finished the dress, within hours of the first time I had to wear it!
7. And the other singers in this group are they as nicely dressed? Well, the men really have it easy. They pretty much get away with regular black trousers, a wool vest, bowtie, top hat & scarf, and a long wool dress coat. And they look great. The other women are more practical than me with costumes that actually fit behind the steering wheel so they can drive in them. But maybe I'll inspire some costume upgrades for next year!
SJSM, Wow – the Uniquely You form sounds great, but it sounds like an enormous undertaking, like you almost need to be a sculptor to do it succesfully! The way you did your daughter’s form sounds really cool. I have only seen the duct tape forms that are stuffed with fiberfill and duct tape left on, but yours sounds much better. I’d love to see a picture of it. Thanks for sharing and thanks for stopping by!
Priscilla: "redistribution of the wealth" -- I LOVE that! What a great way of putting it! :-)
Rebecca Grace
Doing research on dress forms and came across the Fabulous Fit one. How did the smaller one turn out and did the whole system meet your expectations? Would be interesting to find out how you like it a few years later.
Thank you so much for this detailed review. I'm planning on buying a fabulous fit dress form and this is enormously helpful!
this blog post could have been written by me. I made the bootstrap dress form and gave a really large underbust measurement for some reason and ended up with a really wacky dress form. I was about to buy the size 8 fabulous fit dress form, but just double checked my upper chest which is 33 1/2, just like you. I'm off to order the size 6. my waist is more like a size 10 but the rest of me is very small.
Post a Comment